This part of the system documentation deals with all MCM menu items on the main menu tab Compliance - Advanced Settings.
It makes frequent references to other parts of the full MCM documentation.
This topic includes the following sections:
This chapter deals with the external data files that MCM imports and translates on a regular basis. It includes details of the entities and their systems and extents to the contents and layouts of the files. The external entities are referred
to as Data Owners/Providers.
MCM ships with the file layout and content settings of the following Data Owners/Providers:
| Data Owner/Provider |
Data Type |
| IRESS Market Technologies (Bridge/DFS) |
Local equity indices, security information and portfolio gearing |
| State Street Custodian (Insight / Global Quest) |
Custodian data |
| Ord Minnett |
Futures Brokers Data |
| JP Morgan |
Futures Brokers Data |
| National Custodian Services |
Custodian data |
To add additional data providers and files view the chapter External Data Set-up Wizard.
When first opened, the form only displays the Data Owners/Providers as shown below.
Select a Data Owner/Provider in the list box to view the details in the section on the right.
Modifying/Editing
To modify the details of a Data Owner/Provider, select the record in the list box and edit the details in
the section on the right.
When completed press the button Save.
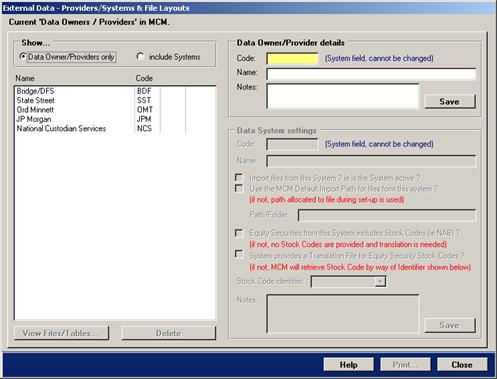
MCM requires the Data Owner/Provider name and a three-character code that cannot be changed.
The three-character code is set when setting up the details via the External Data Set-up Wizard.
To view the associated systems of a Data Owner/Provider, click the option button include Systems in the Show... section.
This will extent the entries in the above shown list box and will include the systems of Data Owners/Providers.
The form including the systems is shown below.
The settings discussed in this chapter rarely change over time.
Change settings only when the Data Owner/Provider has notified of such changes.
The below shown form includes the systems of Data Owners/Providers.
A data owner can have several systems, as is the case with State Street and National Custodian Services.
In the following documentation, systems are also referred to as Data Systems.
Select a Data System in the list box to view the details in the section on the right.
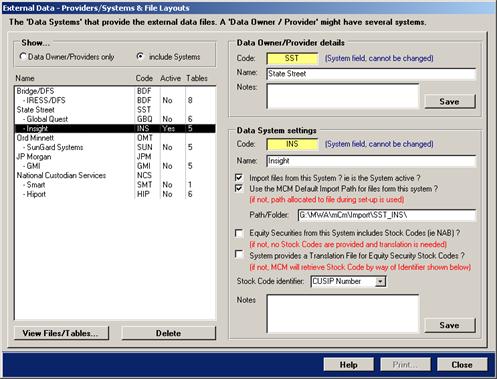
The section Data System settings displayed on the right of the above shown form includes the following settings.
Code – The three-character code is set when setting up the details via the External Data Set-up Wizard.
Name – The name of the data system.
The Notes field is optional.
Press the button Save if changes were made.
The following options are available in the Data system Settings area shown above.
- Import files form this System? – Place a tick into this check box if files from this system are imported on a regular basis.
NOTE: This can also be set via the Data Import Console.
- Use the MCM Default Import Path for files form this system? – Place a tick into this check box if all files from this system are imported from the same location.
If unchecked, the path allocated to the individual files will be used.
- Equity Securities from this System includes Stock Codes (ie NAB)? – Place a tick into this check box if custodian data includes stock codes. See note in side bar.
- System provides a Translation File for Equity Security Stock Codes? – Place a tick into this check box if custodian data does not provide equity stock codes and instead provides a translation file. See note below.
- The Stock Code identifier drop-down menu is designed to select an identifier used by the custodian in the event if no equity stock codes are provided. Available identifiers are: Asset ID, SEDOL, CUSIP and Varloren
All equity securities imported into MCM are automatically registered in a central register.
For new securities encountered, MCM searches the register based on security name and description and other fields that are available, such as CUSIP or Asset ID.
If the security is found in the register, the security stock code is updated.
If the security is not found, it is added to the register and for the user to provide the security stock code.
This is automatically triggered during the import/translation process via the User Intervention mechanism.
For more on this subject, view the manual Compliance in chapter Translation Analysis – Page.
To view the chapter, click here.
To view the settings of external data files from a data system, select the data system in the list box of the previously shown form and press the button View Files/Tables… located at the bottom of the list box. The
following page will appear.
Select a File/Table in the list box and all 3 sections are automatically filled with the details of the selected file.
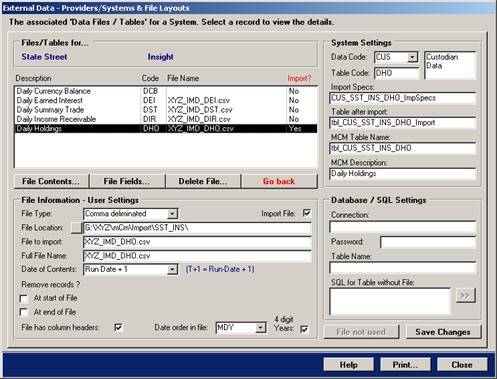
The above shown form consists of the list box that contains all files/tables of the selected Data System and
three sections that displays the details of a selected file/table. Each section is discussed below.
- File Contents… – click this button to view the content description of the selected file
- File Fields – click this button to view the file layout
- Delete File… – click this button to delete the information of the selected file (Caution – This will have an impact on the major MCM processes)
- Go Back – press this button to return to the Data Owners / Providers page
This section consists of the following fields and check-boxes.
- The File Type drop-down menu allows the selecting of commonly used file and database types.
- The File Location is only used if files are not imported from the Data System specified location. If it contains a path then it is the path used initially when the file was set-up.
- The File to import and Full File Name is in most cases the same.
For files that change their name on a regular basis, the field File to import allows entering the file name with wild characters such as *spmse.txt for example.
- The Date of Contents refers to how old the data is. The above shown entry Run-Date +1 refers to the convention Trading Date + 1.
- The Remove record? consists of two check-boxes that allows MCM to automatically remove records after the file was imported. The options are to remove records at the end of a file or the start of a file. When selected two
further options are available, a specified number of records that need to be removed, or based on a value in a specified field within the file.
- The File has column headers check-box indicates to MCM that the file to be imported has column headers in the first row of the file. If unchecked, the first row is data.
- The Date order in file drop-down menu determines the correct date translation during the importing of a file.
- The 4 digit years check-box guarantees that dates are interpreted correctly.
When changing details, press the button Save Changes to permanently save the changes.
The settings discussed in this chapter rarely change over time.
Change settings only if the Data Owner/Provider has notified of such changes.
The System Settings section of the previously shown page contains settings that are automatically provided by MCM when setting up external data files via the External Data Set-up Wizard. They cannot be
changed.
The section includes internal coding conventions for the data and corresponding table. For data files that require import specifications, the name of the specification is provided together with the table name that holds the data after the
import and the table name that holds the appended data. The MCM description is an overall description of the data contained in the external file.
The Database / SQL Settings section is designed for external data that is imported via database interfacing or data that is extracted from other files via SQL settings. The Database / SQL Settings
settings are captured and stored when setting up the file via the External Data Set-up Wizard.
SQL settings allow MCM to extract data from other files/tables via valid SQL statements. To view the SQL statement builder page, select a file that has no external file/table allocated and the button >> will be
enabled. Click the button to access the SQL tab shown below.
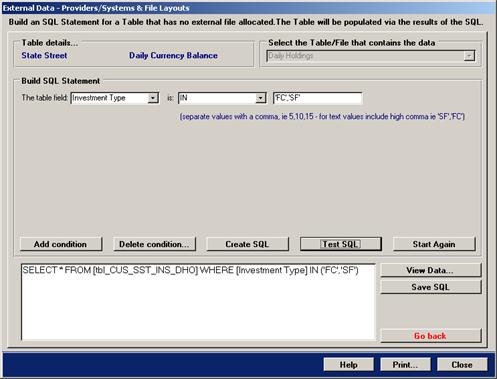
The Key Drop-down Menus
The File/Table from which data is extracted.
The Field drop-down menu contains the fields from the File/Table.
The operator drop-down menu and variable field.
The buttons provide the following functions:
- Add condition – press this button to add up to four conditions
- Delete condition… – press this button to delete a condition
- Create SQL – press this button to create the SQL string when all conditions are completed
- Test SQL – press this button to test the SQL string after the SQL string was completed
- Start again – press this button to clear all conditions and start again
- View Data… – press this button to export and view the resulting SQL data in MS Excel
- Save – press this button to save the SQL string
The SQL Builder allows the construction of complex SQL statements that are executed during the data import process.
The above shown example is appropriate for State Street’s Insight system. It is designed for the MCM Daily Currency Balance table data. Since State Street’s Insight system does not provide a separate file for Daily
Currency Balance, the above shown SQL retrieves the data from the Daily Holdings File from Insight.
The above SQL statement inspects the field Investment Type and it uses the recognised SQL key word IN. When using the IN key word, it is important to add high commas before and after text values and
commas to separate values. Brackets are added automatically.
The settings discussed in this chapter rarely change over time. Change settings only if the Data Owner/Provider has notified of such changes.
The File Contents tab is shown below. The settings determine what actions MCM will take during the translation process that follows the file import process.
Selecting or un-selecting check-boxes results in MCM not processing items or vice versa.
Some securities may be included in files that are inappropriate for MCM to process.
An example could be Margin Accounts, it could be included in the Ledger Balance!
Tcking the MA check-box indicates to MCM that the securities should be excluded.
Another example is the Futures from Custodian that can be excluded if futures are derived from Futures Brokers instead from custodians.
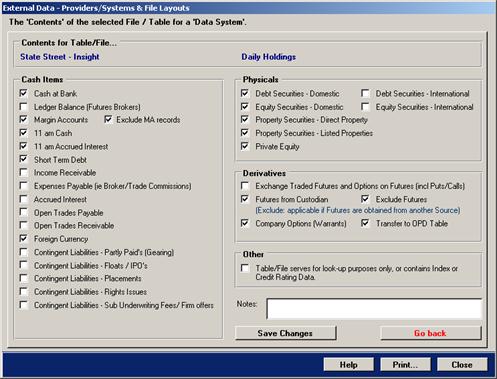
The above shown tab consists of the following sections:
Cash items are securities that are transferred to the MCM Summary Cash Detail table and depending on the cash definition of a portfolio some or all
are included to make up a portfolio’s total cash. Cash items can include:
- cash at bank
- ledger balance
- short-term debt
- open trades (payable/receivable)
- income receivable
- accrued interest
- contingent liabilities
Physical items include debt and equity securities and direct and listed property securities as well as private equity.
Derivative items include comprehensive futures and options on futures, futures from custodian and company options.
The Other section is used for files/tables that are simply look-up tables. Tick the check-box if this is the case.
When changing settings, press the button Save Changes if the changes are to be saved permanently.
To return to the file/table page, press the button Go back.
The settings discussed in this chapter rarely change over time. Change settings only if the Data Owner/Provider has notified of such changes.
The File Fields tab - shown below - is designed to capture the layout of the file fields in the underlying external file/table.
Double-click a record to view the File attributes.
The page is shown on the next page.
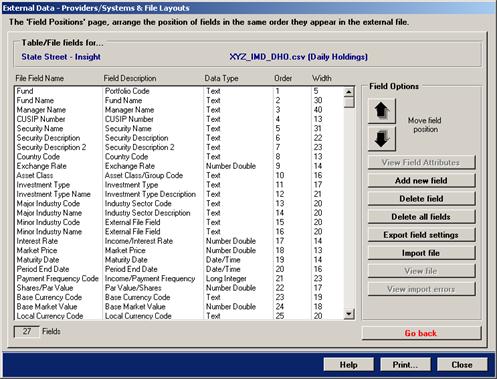
The above shown list box includes the external file’s field names, a description of the field’s contents, the data type of the field, the order in which the field appears and the field’s width.
The user can manipulate each of the items by selecting a field record and pressing the button View Field Attributes or double-clicking the record.
To add a new field, press the button Add new field, this will automatically add a new field to the above shown list box.
To move the position of the field, select the new record and press the large buttons with the down/up arrows.
To delete one field, select the field and press the button Delete field. To delete all fields, press the button Delete all fields.
To export the file fields and attributes to MS Excel, press the button Export field settings.
To import the file, press the button Import file.
If the table exists already within MCM, a message will appear and notify the user that the file was imported already.
The button View file will then be enabled. Press the button View file to view the file in MS Excel.
The button View import errors is only applicable if file import errors were encountered during the importing of the file.
To return to the file/table page, press the button Go back.
The settings discussed in this chapter rarely change over time. Change settings only if the Data Owner/Provider has notified of such changes.
The File Attributes tab - shown below - captures the data type for each field.
The page consists of three sections, the User Settings, System Settings and Field Identifiers.
All settings are initially set when setting up external data files via the External Data Set-up Wizard.
When changing settings, press the button Save Field Changes if the changes are to be stored permanently.
The System Settings and Field Identifiers cannot be changed and they exist for MCM to interpret and translate the contents of an external file.
Field Identifiers
The field identifiers allow MCM to know what values it is dealing with.
They also identify the four key fields:
- Asset Class/Group
- Investment/Security Type
- Income/Payment Frequency
- Industry Sector
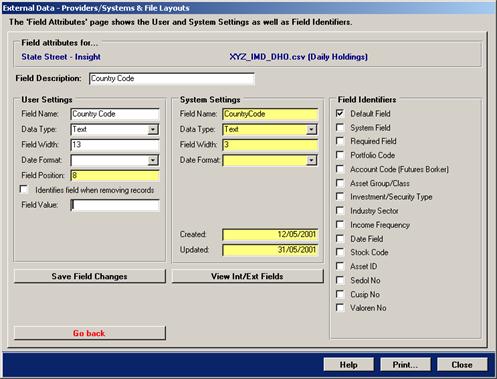
To return to the File Fields page, press the button Go back.
The settings discussed in this chapter rarely change over time. Change settings only if the Data Owner/Provider has notified of such changes.
The Registered ‘Custodians’ form is shown below. Custodians are allocate to the Client Mandate form that was discussed in the
user documentation Client Mandate. To view the topic, click here.
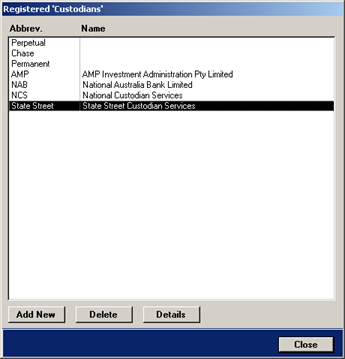
To view the details of a Custodian, select a record in the list box and press the button Details or double-click the record.
The detail page is shown below.
To add a new Custodian, press the button Add new which will create a new record that is displayed in the below shown form.
To delete a Custodian, select a record and press the button Delete.
MCM requires confirmation prior to deleting a record and if a Custodian is allocated to the Client Mandate form, MCM will not be delete the record.
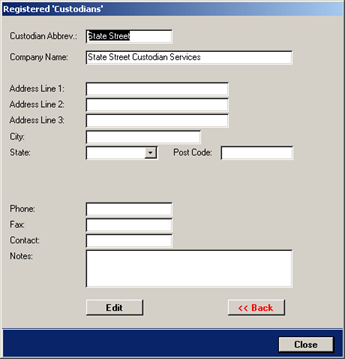
To modify the details of the record, press the button Edit. The button caption will change to Save and the Cancel button will appear.
Enter the custodian’s company name and an abbreviation/code.
The remaining fields are optional.
When complete, press the button Save to save the record.
To return to the list, press the button << Back.
The External Data Set-up Wizard is designed to provide a step-by-step procedure in setting up the file
details of external data files that MCM uses on a regular basis. The external data files can contain custodian data,
futures brokers data and equity indices and security information data.
A thorough understanding of the external files and their layout is required when using the External Data Set-up Wizard.
External data files primarily originate from systems of custodians and futures brokers.
As such many variances can exists in the structure of the files and the meaning and contents of individual file fields.
Obtaining sample files and file layout documentation is a prerequisite when using the External Data Set-up Wizard.
The ideal situation would be if for each internal MCM table an equivalent file is provided by the Data Owner.
This may be the case in some instances however the following pages demonstrate that it can also works with a minimum of one file!
Adding external data file settings from new Data Owners/Providers may necessitate programmatic and/or other changes to the MCM system.
The following is on overview of the MCM propriety table structures for external data.
| Data Source |
| Custodian |
| Futures Brokers |
| Index Data |
| Table Name |
Content Description |
| Daily Currency Balance |
Can include Cash at Bank, Margin Accounts and Accrued Interest on 11 am Cash and other Short Term Investments. |
| Daily Earned Interest |
Can include accrued interest due on securities. |
| Daily Holdings |
Can include all types of securities. This may include Equity, Debt, Fixed Interest, CPI as well as Company Options. |
| Daily Income Receivable |
Can include dividend income and other receivables. |
| Daily Summary Trade |
Can include investment transactions that are still open, ie open sells (Receivables) open buys (Payables). |
| Client Financial Summary |
Can include the currency balance(s) of a Portfolio. The information is from Futures Brokers. |
| Open Positions Details |
Can contain individual open Futures and Options positions and typically it includes Contract Code, Type, Options Type, Currency, Traded Price. |
| Futures/Options Price Data |
Contains Futures and Options contract details such as Strike Price, Delta Rate, Settlement Price, Delivery Month. |
| Trading Advice Details |
Can contain buy/sell information including deal references such as originating Broker, Currency and Market. |
| Stocks not in Local Index |
Includes security details of securities not in indices or listed. Data can be sourced from systems such as IRESS/DFS. |
| Global Index Data |
Global indices such as MSCI. |
| Local Index Data |
Local indices that can be sourced from IRESS/DFS. |
| Portfolio Gearing |
Portfolio gearing that can be sourced from IRESS/DFS. |
Some MCM users receive custodian data that includes futures data.
However, they exclude the custodian’s futures data because more comprehensive futures data is obtained from Futures Brokers.
The opening tab of the External Data Set-up Wizard is shown below.
The options are to set-up new files or modify existing files.
The following example is based on setting up new files.
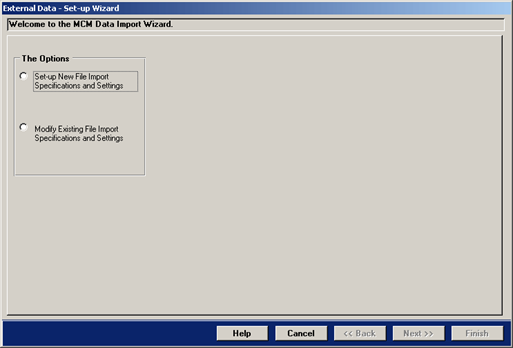
Select the Set-up New File Import Specifications and Settings option and the additional options appear as shown below.
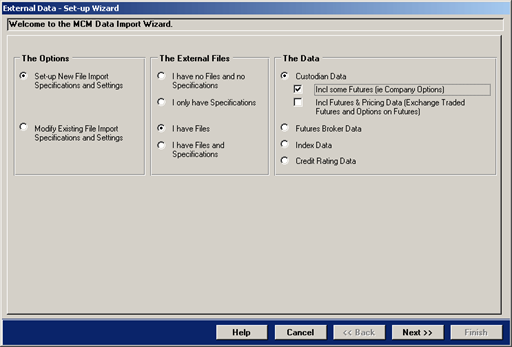
The two additional sections that have appeared and are as follows:
The Wizard continues only if the options samples of the files are present and files and specifications are present.
Select the appropriate data that will be set up. The following example uses custodian data that may include some futures.
Press the button Next >> to continue. The following tab will appear.
New Data Provider
Adding a new Data Provider requires adding a new Data System.
Existing Data Provider
Select an existing Data Provider to view the existing Data Systems.
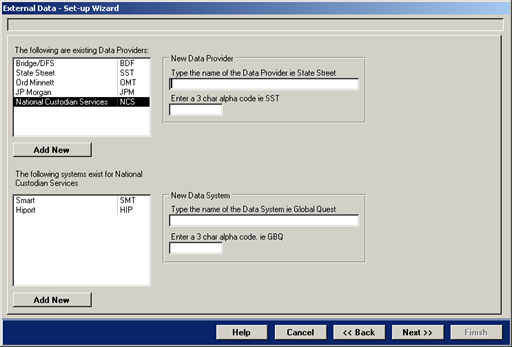
Select to use an existing Data Provider or enter the details of a new Data Provider.
The initial option to set-up new files implies that a new Data System is set-up.
The example uses a new Data Provider (Deutsche Bank Custodian Services) and a new Data System (Deutsche Custodian Access).
To continue, press the button Next >>.
All settings entered here can be changed later on as discussed in the chapter Providers/Systems and File/Layouts.
The next step is to fill in the details for the Data Provider Settings and Data System Settings .
The tab is shown below.
Not every external data provider is a custodian.
If it is, tick this check-box.
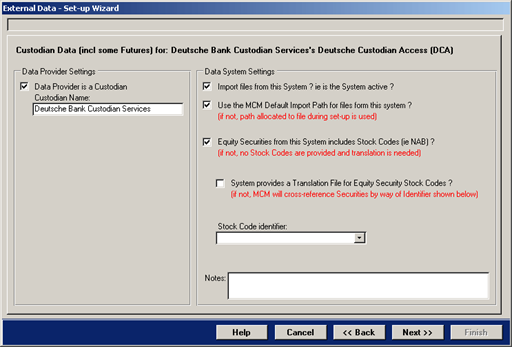
Each of the options shown in the above right section is discussed in the following topic.
The settings are vital for MCM to make the correct decisions during the import and translation processes.
- Import files form this System? – Place a tick into this check box if files from this system are imported on a regular basis
- Use the MCM Default Import Path for files form this system? – Place a tick into this check box if all files from this system are imported from the same location.
If unchecked, the path allocated to the individual files will be used
- Equity Securities from this System includes Stock Codes (ie NAB)? – Place a tick into this check box if custodian data includes stock codes
- System provides a Translation File for Equity Security Stock Codes? – Place a tick into this check box if custodian data does not provide equity stock codes and instead provides a translation file
- The Stock Code identifier drop-down menu is designed to select an identifier used by the custodian in the event if no equity stock codes are provided. The available identifiers are: Asset ID, SEDOL, CUSIP and Varloren
- The Notes field is optional
To continue, press the button Next >>.
This completes the first part of the External Data Set-up Wizard. The first part included the information of the Data Provider and the Data System.
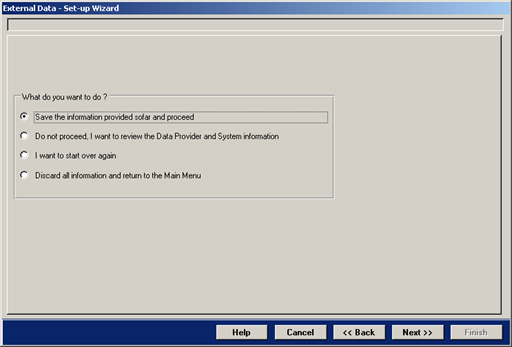
To continue and save the information provided so far, press the button Next >>. To review the information provided, press the button << Back.
The content of the next tab that is shown depends on the initial data choice that was made.
The example here uses the Custodian Data option.
The Default MCM Tables for the option Custodian Data is shown below.
A description of each Default MCM Table is provided, simply select a default table in the left list box.
The purpose of this tab is to indicate to MCM if an external file exists for each default table.
Do this by selecting a default table and then pressing the button I have a File or I have no File.
The below shown tab is designed to nominate for each default table an external file.
In addition, the tab provides a description and the default fields expected for each default table.
The Wizard only continues if at least one table has one external file.
If only one external file is provided, the default table Daily Holdings must be selected for this file.
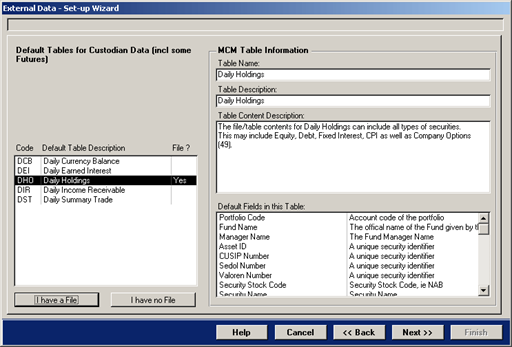
In the above example, only one external file is used and it is allocated to the key default table Daily Holdings. To continue, press the button Next >>.
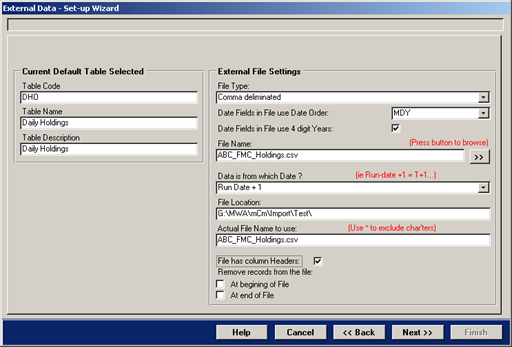
The left section of the above shown form is filled in automatically and the right section needs filling in.
The drop-down menus and check-box option are discussed below.
- The File Type drop-down menu allows the selecting of commonly used file and database types. The above example uses the Comma Deliminated type
- The Date Fields in File uses Date Order drop-down menu determines the correct date translation during the importing of a file
- The Date Fields in File uses 4 digit Years check-box guarantees that dates are interpreted correctly
- The File Name text box has a >> button next to that opens the Windows File Open dialog box. Use this to locate the file. This will automatically enter the File Name, File Location and Actual File Name to use fields
- The Data is from which Date? refers to how old the data is. The above shown entry Run-Date +1 refers to the convention Trading Date + 1
- The File has column headers check-box indicates to MCM that the file to be imported has column headers in the first row of the file. If unchecked, the first row is data
- The Remove records from the file consists of two check-boxes that allows MCM to automatically remove records after the file was imported. The options are to remove records at the end of a file or the start of a file.
When selected two further options are available, a specified number of records that need to be removed, or based on a value in a specified field within the file
When completed, press the button Next >>.
Depending on the file format selected, the Wizard will immediately import the file when the Next >> button is pressed.
The following tab page will appear.
After each match, the field attribute tab appears. The tab is shown further below.
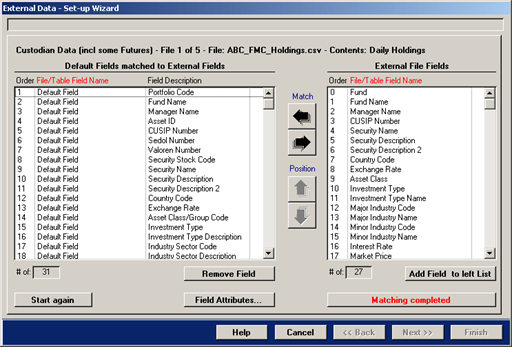
The purpose of the above shown tab is to match MCM default fields with the imported file's fields.
The tab consists of two list boxes. The left list box contains all default fields for the current default table and
the right list box contains the fields of the just imported file.
The Field Matching requires that MCM default fields - shown above - are matched to external file fields.
To do this, simply follow the below steps:
- Select a default field in the left list box
- Select the corresponding matching field in the right list box
- Press the left-pointing arrow to match the two fields
- A tick will appear in both list boxes next to the selected field
- To un-match the fields, both fields must be selected and then press the right-pointing arrow
Once all fields are matched there may be addition fields in the external file (right list box) for which there is no default field in the left list box.
In this case, select the field in the right list box and press the button Add Field to left List.
All fields in the right list box must be processed either by matching or by adding them to the left list box.
Once completed press the button Matching completed and the system will verify the matching.
If unmatched fields exist in the default list box (left) the system provides a message box listing all default
fields that have no matching external field. If all external fields were matched, select to discard the remaining fields.
The system will then discard the remaining fields and disable the matching arrow buttons and enable the position arrow buttons.
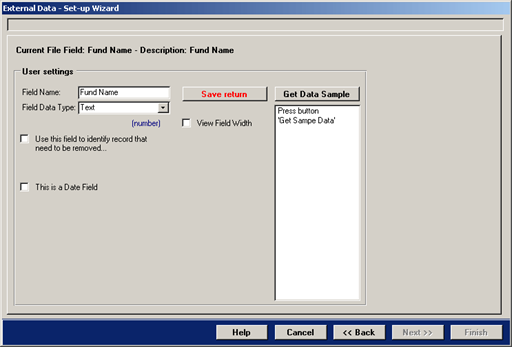
The field attribute tab is shown below.
The tab appears every time two fields are matched.
It is designed to provide the correct field settings of the external file field.
If unsure as to what the correct data type is for the current field, press the button Get Data Sample.
Press the button Save return to return to the field matching page shown on the previous page.
Use the Double data type for fields that contain numbers.
Use the Text data type for fields that contain numbers and text.
For date fields, tick the check box and select the correct date format form the drop-down menu that will appear.
Once the field matching is completed, the positioning is required.
The tab below shows all fields matched and the positioning buttons enabled.
The positioning of fields occurs in the left list box.
Select each field and position it so that they all line up with the fields in the right list box.
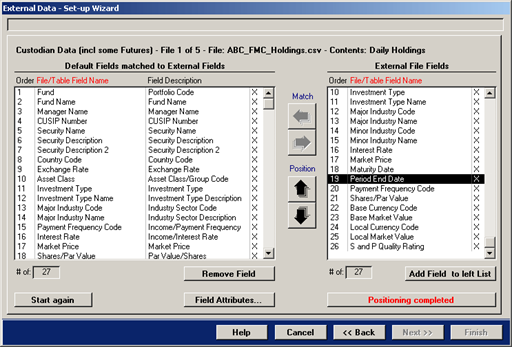
Once the positioning is completed, press the button Positioning completed.
The Wizard will then verify the fields and enable the Next >> button.
To continue, press the button Next >>.
The setting up of the current external file is now complete and by pressing the Next >> button,
the Wizard attempts to retrieve unique values from key fields of the external file.
The key fields were identified during the field matching.
The values that are retrieved are then available in the Translation Set-up and Settings that is discussed in
the next chapter below.
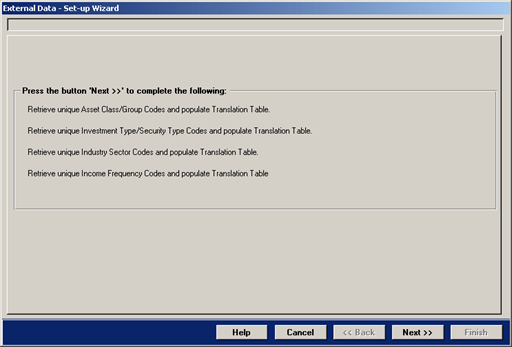
Press the button Next >> for the Wizard to retrieve unique values from the key fields of the external data file.
The following tab will appear next.
The External Data Set-up Wizard has completed when the tab below is shown.
The following tasks need now completing:
For each file that was set-up, the contents of the file needs to be identified via the Providers/Systems and File/Layouts.
See the chapter of the same name for more information on File Contents.
Unique values of the key fields retrieved by the Wizard are automatically added to the translation table.
They now need to be translated to MCM values.
This is discussed in the next chapter Translation Set-up and Settings.
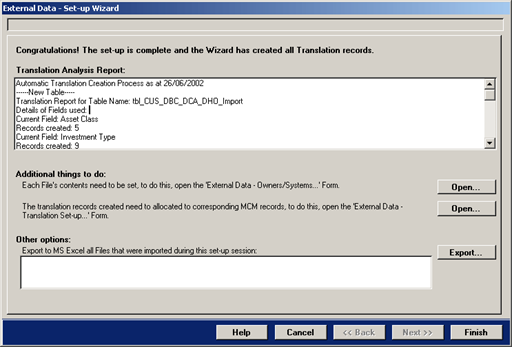
The text box on the above shown tab contains a report of all key values that were retrieved and entered into
the translation table. The key values refer to coding conventions used by the external Data Provider.
The coding conventions need to be translated to MCM coding conventions.
This is discussed in the next chapter Translation Set-up and Settings.
In addition, the external file contents must be identified.
This is discussed in the chapter Providers/Systems and File/Layouts.
To finish the process, press the button Finish.
The chapter Translation Set-up and Settings concerns the external data that is imported and translated on a regular basis. Only key values of the external data need translating. MCM recognises the key values by way of
default field identifiers that are created when setting up new files for external Data Owners/Providers. This is discussed in the chapters Providers/Systems and File/Layouts and External Data Set-up
Wizard.
The most import aspect of the translation of external data relates to the identification of a security’s investment type.
MCM refers to this as the Investment/Security Types. MCM needs to translate each imported
record’s Investment/Security Type in order to process and evaluate the data correctly.
MCM uses four key field identifiers that allow the system to correctly translate imported data records.
The four key fields are:
- The Asset Class/Group field (ACG)
- The Investment/Security Type field (IST)
- The Payment/Income Frequency field (PIF)
- The Industry Sector field (IS)
The coding conventions of external data providers is not straight forward in terms of providing precise codes for the
four key fields and instead quite often a combination of codes in the four fields determines a record’s
investment/security type.
Because of this, the Translation Set-up and Settings facility provides two options in how external data
records are translated.
- The first option is a simple external code A = MCM code B type operation
- The second option allows for more complex SQL statements that inspect values in a number of fields
The following is an illustration of the two options.
| Coding Examples of External File Key Fields |
MCM Translation |
| Asset Class/Group |
Investment/Security Type |
Payment/Income Frequency |
Industry Sector |
MCM Security Type |
| A |
|
|
|
Equities |
| B |
1 |
1 |
X |
Mortgage/Asset backed securities |
| B |
1 |
2 |
X |
Inflation-linked securities |
| C |
2 |
1 |
|
Corporate Bonds |
| C |
2 |
2 |
|
Government Bonds |
| C |
2 |
2 |
X |
Semi-Government Bonds |
External Investment/Security Type code with several MCM translations can be tested in order to find the queried record.
If a record is returned allocate the MCM code otherwise flag the record.
Flagging a record results in a user intervention action during the Import & Translation process.
When setting up external data files via the External Data Set-up Wizard MCM retrieves all unique values of the four
key fields and adds them to the Translation register.
They then need to translated by the user in the way described in this chapter.
In most cases the translation of the coding conventions is a one-off task, they rarely change!
New values encountered during the regular import/translation processes are automatically added to the Translation
register and the process is interrupted for the user to allocate the correct MCM code(s) before the system continues.
New external codes can be added at any time in the way described in this chapter.
The Industry Sector codes currently do not require translation!
When first opened, the Translation Set-up and Settings form requires that an item from the drop-down menu Translate be selected. The form is shown below and the Investment/Security Type is
selected.
Main Selection
Select the item to be translated from the Translate drop-down menu.
Select the Data Provider from the From drop-down menu.
Select the Data System from the System Name drop-down menu.
Press the button View Details…
�

After selecting one of the key translation items and the Data Provider and Data System,
press the button View Details… to view the external codes, the MCM descriptions and the allocated/translated record.
The detail page is shown below.
The list boxes
The left list box contains the MCM records for the selected translation type.
The list box in the middle contains the external records/codes for the selected translation type.
The right list box contains the translated records for the selected record from the right list box OR the list box in the middle.
The above shown form has two options in the way allocated/translated records can be viewed and they are:
- Select an MCM record in the list box on the left.
This will refresh the right list box and show the external record(s) that may be allocated/translated.
If no records are shown in the right list box, no external records are allocated to the MCM record.
- Double-click a record in the list box in the middle (external records).
This will show record(s) that may be allocated/translated in the right list box
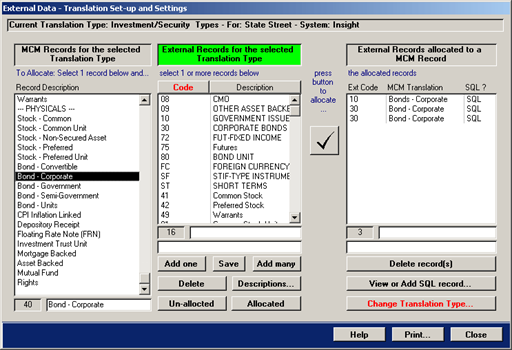
The same page is shown again below for additional documentation purposes.
In the example below, the MCM record Bond – Corporate is selected in the left list box and the right list box
shows three records that are allocated to this MCM record.
The right list box contains three columns, the first shows the external record’s code, the second column is the
MCM record description and the last column indicates if an SQL statement is attached.
Click the column headers of the middle list box to sort the records.
Delete an allocated/translated external record/code by pressing the delete button below the right list box.
Change the translation type by pressing the translation button below the right list box.
To allocate an external record code to a MCM record code follow the below steps:
- Select the MCM record in the left list box
- Select the corresponding external record in the middle list box
- Press the large button with the tick. This will update the right list box with the translated record
At this stage only the external code was translated via the straight MCM code A = external code B operation.
To add a more complex SQL statement, select the record in the right list box.
Press the button View or Add SQL record…. This is discussed further below
On the above shown form there are seven buttons below the middle list box. Each button is explained here.
| Add one |
Press this button to add one new external code.
Enter the code into the dialog box that appears and then press OK.
The new record will be selected in the list box as well as shown below the list box.
The new description reads Auto Entry x/x and it appears also below the list box.
(x/x = the date of the entry) |
| Save |
Selecting a record in the list box will show the code and description in the two text boxes below.
When making changes in either of the two text boxes, press the button to save the changes. |
| Add many |
Press this button to add many new external codes.
The screen that will be shown is displayed further below. |
| Delete |
Select a record in the list box and press this button to delete an external record.
Confirmation is required prior to deleting a record. |
| Description… |
Press this button to add the description to external codes.
The screen that will be shown is displayed further below. |
| Un-allocated |
Press this button to view the external codes that are not allocated to MCM codes. |
| Allocated |
Press this button to view all external codes that are allocated to MCM codes. |
The adding of new records was discussed in the above topic.
To add description to external codes do either of the two options:
- If the description is known, select the record and enter the description into the text box below the list box.
Press the button Save to save the description.
- To retrieve the description, press the button Description… and the below tab appears.
To automatically retrieve the description of external codes follow the below steps.
NOTE the description field must be in one of the external data files/tables!
- Select the table in the left list box
- Select the field that contains the external code from the list box in the middle
- select the field that contains the description from the list box on the right
- Press the button Update to update the codes with descriptions
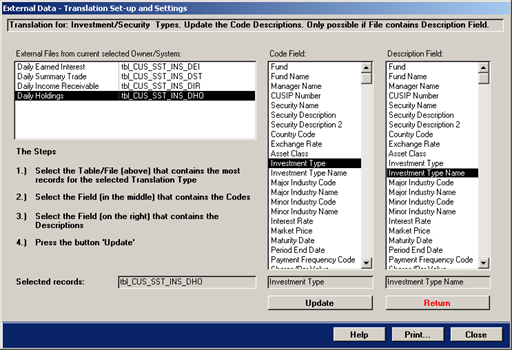
To return to the page shown previously, press the button Return.
To add an SQL statement in addition to the external code, select the record in the right list box shown on the tab
(second last image) and then press the button View or Add SQL record…. The tab shown below will appear.
There is no limit as to how many records can have a SQL statement. Equally not every record requires a SQL statement!
To add a new record that will contain an SQL statement, press the button Add new Record.
Select the new record and then press the button Build new SQL.
The SQL Builder is shown on below.

Write the SQL statement directly into the lower text box and then press the button Save changes or use the SQL builder by pressing the button Build new SQL….
The SQL builder is shown below. The underlying table from which to extract the records is determined when initially setting up the external data files and it cannot be changed here.
The Table Field drop-down menu contains all fields from the File/Table.
The operator drop-down menu contains standard operator including the IN operator.
Use the variable field to enter values that are encountered in the field.
Use And or Or operators between conditions.
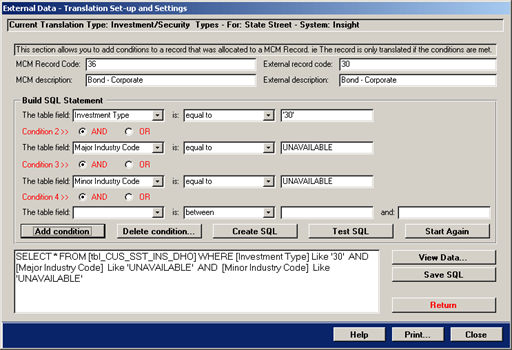
The following buttons are available in building valid SQL statmenets:
Add condition – press this button to add up to four conditions.
Delete condition… – press this button to delete one condition
Create SQL – press this button to create the SQL string when completed.
Test SQL – press this button to test the SQL string after the SQL string was completed.
Start again – press this button to clear all conditions and start again.
View Data… – press this button to export and view the resulting SQL data in MS Excel.
Save SQL – press this button to save the SQL string.
Return – press this button to return to the previously shown page.
The above shown SQL statement is appropriate for Corporate Bonds for data from State Street’s Insight system.
The Corporate Bond records are contained in the MCM table Daily Holdings.
An example of the SQL statement is shown below.
SELECT * FROM [tbl_CUS_SST_INS_DHO] WHERE [Investment Type] Like "30" AND [Major Industry Code] Like "UNAVAILABLE" AND [Minor Industry Code] Like "UNAVAILABLE"
The General Process Defaults concerns values that MCM uses during the import/translation and consolidation processes.
The values are as follows:
Accrued Interest
Determines if MCM will include accrued interest for securities with a coupon payment date that becomes due in x number of months.
The accrued interest is added to the cash details table. The x number of months is user definable.
Discount Rate
Applies to contingent liabilities only and it determines the underlying discount rate when calculating the present value of short fall.
Yield
Is used during the consolidation process’s stress testing and it is only used if the implied yield is out of range.
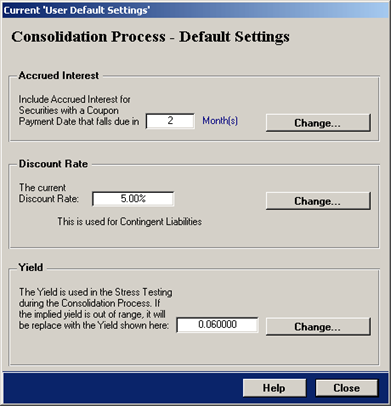
To modify any of the above values, press the button Change….
A separate dialog box will appear, enter the new value and press the button OK.
The MCM Investment Type register is shown below and it is read-only with the exception of the stress test
values that can be applied to individual investment types.
The stress test values are used during the consolidation process’s routine stress testing.
To change the values, select an investment type record in the list box and the existing values will appear in the upper right
hand section User Settings.
Enter the new value and press the button Save.
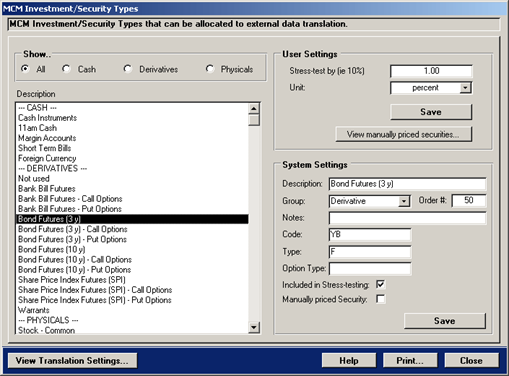
The values in the System Settings section cannot be changed.