Version R6.51.11/18 – Release Notes


Version R6.51.18 is the latest PCBx3 Manager Release available for download as of December 6, 2015.

The below release notes concerns all new features, improved functions and bug fixes since the last official release of versions R6.41.66 and R6.41.73.

The release notes include the following topics:

New Features

Release 6.51.11 brings several new features that assist in automation, reporting and monitoring and some existing features were re-designed to provide a new, simpler and more integrated experience. To read more about each feature, simply click the heading.

Purchase Order and Purchase Invoice

A new purchase order / purchase invoice form replaces the existing form. The new form provides superior functionalities that are explained below.

Key functions of the new form are:

  • opens directly from the project or service job registers
  • designed for fast data-entry
  • enter multiple line-items
  • each line-item can be for a different job
  • transactions can be edited until purchase invoice is paid
  • automatically generate back-orders
  • automatic cost allocation to underlying quoted item (in case of one quoted item only)
The Old Purchase Order / Invoice Form

The old purchase order/invoice form is shown on the right.

The form is replaced in R6.51.11 with the new form shown below.

The NEW Purchase Order / Invoice Form

The new purchase order/invoice form is shown on the right.

For new transactions, the default status is “To Order” and the right header section reads “Order Total”.

For quick navigation through fields use the tab key.

For purchase orders, you can set the expected delivery date in the header section. In case of multiple line-items, the expected delivery date can be batch updated on selected line-items to a different delivery date.

If no order was or will be issued, simply set the status to “Received”.

NEW Purchase Order / Invoice Form in Action

For new transactions, use the tab key to quickly navigate from one field to the next.

Type the vendor name into the Vendor drop-down menu for quick selection.

Tab into the Type drop-down menu and then into the Order Date field. Use the plus/minus keys to change the order and delivery dates.

Confirm the Ordered by selection and then use the tab key to enter the grid.

The first Job # field contains the job number the form was called with. If no selection was done, the form displays the warehouse project ID.

Accept the job ID or enter a different job ID. Enter X into the field and then tab out to open the job finder form.

NEW Purchase Order / Invoice Form in Action continued...

Enter a valid Cost # (cost allocation code) or enter X and then tab out to open the cost allocation form to select from. Enter a valid Stock # or enter X and then tab out to open the Stock Picker form.

Tab into the Qty field and enter the quantity and then move to the Rate field. The system requires the Qty, Rate and Description.

After entering a description, use the tab key to move to the next line-item.

Press the Save button when completed.

Use the line-item checkboxes to select multiple line-items to delete line-items or update the expected delivery date for the selected line-items (applicable to orders only).

To submit an order, open the Pending Purchases Register.

Opening an existing Purchase Order / Invoice Transaction

When opening an existing purchase order/invoice transaction all fields are locked.

Press the “Edit” button in the lower right section of the grid to unlock all fields.

Once unlocked, other users can’t edit the same transaction, they will receive a message that the transaction is currently being edited.

You can edit and add line-items right until the purchase invoice is paid.

However, if you have placed an order and then set the status to received, you cannot delete a line-item previously ordered. You can add additional line-items and you can delete those additional line-items.

Purchase Invoice Transaction

Once the status is set to “Received” the right header section reads “Invoice Total”.

Click the “< Order” button on the left above the grid to view the underlying order details.

For new transactions, the Purchase was paid checkbox will appear next to the Save button.

For purchase invoices, use the line-item checkboxes to select multiple line-items to delete line-items or update the charge-out margin for the selected line-items (applicable to cost-plus).

Note, you can only delete a purchase invoice line-item if no underlying order line-item exists.

A back-order is automatically generated for each line-item where the invoice quantity is less than the order quantity.

Purchase Payment Options

If the Purchase was paid checkbox was selected, the Purchase Payment Options form will appear after the Save button is pressed. The payment option form is shown on the right.

The payment options are: Paid in full, Partial payment and Paid by HR.

Selecting partial payment will open the Accounts Payable form.


Pending Purchase Orders - Register

The pending purchase orders register lists purchases orders that need finalising and submitting and purchases order awaiting delivery.

Access to the register is provided via the project and service job registers, the purchase order detail form, job purchases and the main menu.

Purchase Orders | Register

Purchase orders that need finalising – status: To Order - are shown in the top list.

To print or email a purchase order, select the purchase order and click the button Send Purchase Order. A separate window provides further options including delivery instructions and address to deliver to.

To combine multiple orders from a single vendor, select the records in the top list and then lick the bottom Combine Orders.

Purchase orders that were submitted and are awaiting delivery of goods – status: Ordered - are shown in the bottom list.

Double-click in both lists to open the purchase transaction. Select a purchase and click Dashboard to open the job/project menu. For purchases across multiple jobs, the job selection dialog will open.

To start a new purchase, click the plus (+) button. Purchases initiated from the register will default to the project warehouse. To select a different job simply enter the job ID.


Job specific Purchase Transactions

The new job purchase transactions form is split into three sections: purchase orders to finalise, purchase orders awaiting delivery and purchase invoices. Double-click in any of the lists to open the purchase transactions.

Menu Options

Click the Pending > button at the top right to open the Pending Purchases Register. Click the Back Order > button to view back orders only.

Press the plus (+) button to create a new purchase order/invoice. Press the … button to view the purchase order details.

Press the x button to delete the selected purchase transaction. If the purchase transaction spans multiple jobs the whole transaction cannot be deleted. Instead open the transaction and delete the line-items applicable for the job.

Click the XL button to export the purchase invoices list to Microsoft Excel. Click the magnifying glass to open the Transaction Register.


Review Charge-out Items

The improved Review Labour & Material charge-out form was formerly called Amt not billed yet. The form is designed to review or edit the amount charged out for labour and material for cost-plus jobs or projects.

Only transactions not previously invoiced are shown.

Options

For material purchases, simply accept or overwrite the charge total or profit. Use the tab key to move to the next field or line-item.

Click the << Labour button to view labour transactions. Values that can be edited for labour transactions are charge rate, charge total or profit.

Click the Create new sales invoice >> button to generate a sales invoice that includes all labour and material transactions shown in the review form.

Note, sales invoices generated from the review form can be further modified / deselected on the sales invoice form.


Job Labour - Sinlge Transaction (Existing)

The existing single transaction job labour form was redesigned and includes several new features. The form shown below can now be called directly from the project or service job registers. If no job is selected in either of the registers, the form opens and defaults to the warehouse project.

Timesheet Section

Selecting the HR will now automatically retrieve and set the HR’s default service/trade category.

The timesheet data includes now a field to capture any breaks.

Use the plus (+) or minus (-) keys to increase decrease: the date, start and end times and break in hours.

Overwriting the total hours will automatically adjust the end time.

The activity description can be enlarged and the number of characters is displayed.

Payroll Section

The base hourly rate and total (rate * hours) can be overwritten.

The day rate and total (rate * days) can be overwritten.

Job / Project Section

The charge-out total and rate can be overwritten and reset again. Charge-out related tips and access to category charge-out rates is provided.

For new transactions, the calculated hourly on-cost rate provides calculation details.


Job Labour - Mulitple Line-items (New)

The new job timesheet / pay information data-entry form allows entering multiple line-items for multiple jobs and human resources and post all in one transaction.

The form is designed for speedy keyboard data-entry and it includes an auto-fill option for up to three HR. Simply move from field to field using the tab key. Transactions entered with this form can be opened and edited with the existing single transaction form.

The new form opens directly from the project / service job registers and the labour and material allocation form.

The form caters for both timesheet and payroll information. Payroll information is optional and if not used HR defaults (base hourly rate) are used.

The form can be called with a selected job or without. If no job is selected the form defaults to the warehouse project.

Initial Opening

The form is ready for data-entry, simply use the tab key to move into the grid’s first line field - the job ID.

There are defaults above the grid that can be set to automatically fill in start and end times, break (in hours) and total hours. The Start on date is used in the first line and by the Auto-fill function (explained below).

Tap into the date field and then type the HR name. When leaving the HR field the service category is automatically selected. Tab through all fields and enter an activity description.

Use the + (plus) or - (minus) keys in the fields [Date], [Start], [End] and [Break] to increase or decrease the value.

Enter [x] in column [Job #] and then tab out to open the Find a Job form to search for a job.

Enter [x] in column [Cost #] and then tab out to open the quoted items for the line’s job ID.

Enter [x] in column [>] and then tab out to open the pay information form. Note, if no custom pay information is entered via column [>], the system will apply the default pay for each HR.

Auto-fill Function

Use the auto-fill function to quickly populate the grid with timesheet data for up to 3 HR.

Simply select the number of HR and the number of transactions.

For each HR a job ID, the service category and an activity description is required. The initial date is the Start on default and for subsequent lines the date is automatically incremented.

The auto-fill function fills the grid only, to save the transactions press the Save button that appears when auto-fill is complete.

Press the delete button next to the Save button to clear the grid and start afresh.

Grid Options

Use the checkboxes to select one or more lines to get the total hours and break (in hours).

Select one or more checkboxes to delete lines.

Tick one checkbox and then select insert to insert a new line.

Enter [x] in field [>] and then tab out to open the pay information form – shown below.

Press the delete button next to the Save button to clear the grid and start afresh.

Press the Save button to save all line-items to database.

Payroll Information

Enter [x] into the field [>] and then tab out to open the payroll information form as shown on the right.

Press tab again and the default payroll information is retrieved.

Press the Esc key to close the form without saving.

Tab through all fields and onto the Save button and the press enter to save the payroll information.

Use the payroll information form if you want to record allowances for the day or record a different base hourly/daily rate or total for the day.

For cost-plus jobs the charge-out rate and total is available and both can be edited. The charge-out rate is fetched based on the service category for the selected HR. Click the symbol next to the rate to open the Charge-out Rates form.


Job Labour - Activity Timer (New)

The new job labour – activity timer is designed to time an activity and when complete transfer the entry to the proper labour form.

The form is accessed directly from the main menu and from where the other main two job labour forms can be called from.

When called from the main menu, the job ID defaults to the warehouse project. To change the job reference, simply enter a valid job ID.

Functions

Simply press the green button to start the stop watch and begin with the activity.

Stop and start and continue anytime.

To save, press the tick that is available once the stop button is pressed.

The minimum activity length is 15 minutes. The maximum activity description is 250 characters.

A job ID is required, enter a valid job ID or enter [x] and then tab out to open the job search form.


Job Transaction Register

The job transaction register was redesigned and new features were added.

New Options

The form allows now searching by who entered transactions.

The form can be called from many locations and when opened may show all transactions requested or it may limit the number of transactions to the current month.

Click the current month to show the date fields.

Use the arrows next to the dates to select the next or previous month.

Alternatively use the plus (+) or minus (-) keys to increment the date.

Viewing material transactions allows now searching for a purchase invoice number.

Data exported to Microsoft Excel is now formatted for ease of reading.

Select a transaction and then press the Dashboard button to open the job menu, cockpit and selected transactions type.


Quote Line-item and New Quote Report

The existing Quote line-item detail form provides now the option to view and edit the client item description and client item amount on the same form. The client items are not shown by default.

Click the Client Item > button to display the client item description and client item amount as shown below.

New Quote Report

The new quote report – Item Description with paragraph heading – is identical to the existing Item Description report except hat it uses the Item Description as a heading in bold followed by the Client Item Description as the main paragraph.

If the Client Item Amount is used, it is shown on the same level as the heading.

For large quote reports that use the client item descriptions, the new report with the bold headings provide an effective visual break-up and easy to read report that looks and feels professional.

The new report is accessed via the Quote Print Option form and can be printed including PDF and emailed in HTML format.


Quote Line-item Calculation Worksheet

Selecting the unit type “Calc” on the quote line-item detail form provides access to the line-item calculation worksheet. The calculation worksheet was redesigned to provide greater functionalities.

The calculation worksheet is designed for quick data-entry of quantity take-offs ideally suited for when one area with varying dimensions needs detailed costing. A roof or different types of rooms or areas shown on architectural plans are examples where detailed quantity take-offs are required.

New Options

In previous versions the length and width were recorded separately on the calculation worksheet.

In the redesigned worksheet both length and width are entered on each line. The total quantity per line is calculated and a new notes field allows for brief notations on a line by line basis.

Click the plus (+) button to add new rows. Press the delete button to delete all entries. Set the width and length to zero to delete rows when pressing Update. Click the AA button to increase or decrease the form size.

Click the Update button to update the quote line-item form and then enter a unit rate on that form to calculate the total amount.

Note the calculation worksheet returns the square root to the length and width fields on the quote line-item form. To double or increase the total quantity, simply increase the Unit Quantity. For cubic meter calculations, use the Height field.


Monthly Request and Quote Analysis

The monthly request and quote analysis forms were replaced in Release 6.51.11 with Microsoft Excel based reports.

In previous versions, the two forms were accessed via the main menu’s management page and they reported on the current financial year performance only.

The XL versions were introduced to allow for calculations that users may want to add and to provide flexibility for future reporting requirements.

Access via the Report Menu

The new analysis reports are now accessed from the report menu.

Select the report category Operation Analysis and then click on the required report.

To show the performance for a particular financial year, select the year from the Financial Year drop-down menu and then click on any of the print and export options buttons to generate the report in Microsoft Excel.

If the financial year is not in the drop-down menu, leave it blank and enter a date that falls into the financial year you are after into the Dated From field.

Monthly Request Analysis

The monthly request analysis includes now a monthly analysis by request type. The request type is a flag that can be set on the request detail form introduced in Release 6.51.11.

The monthly request analysis is automatically generated in Microsoft Excel and configured for immediate printing if required.

Each time the report is accessed a file with a unique file name is generated and saved in the main report folder.

Monthly Quote Analysis

The monthly quote analysis report is identical to the original form report that it has replaced.

The monthly quote analysis is automatically generated in Microsoft Excel and configured for immediate printing if required.

Each time the report is accessed a file with a unique file name is generated and saved in the main report folder.


HRM - Entity Master Timesheet and Default Employee Entitlements

Release 6.51.11 provides a number of new Human Resource Management (HRM) functions that concern employees only.

The HRM - Entity Master Timesheet and Default Employee Entitlements apply for the logged in Entity and they serve as templates for when setting up new employees.

For example, an entity master timesheet may be configured for a 40 hours week and a new employee works part-time and only 32 hours. The entity master timesheet is transferred to the employee and can then be configured for the 32 hours by deleting days or changing daily start and end times.

Entity Configuration

To access the new Entity Master Timesheet and Default Employee Entitlements select the system main menu page and then click on Entity Setup and select Financial & HR.

Note, when creating the master timesheet, the # of hours in a full-time work week shown on the entity setup form must match the total # of hours on the master timesheet.

Click on the Master Timesheet button to open it as shown below.

Click on the Entitlements button to open them as shown below.

Entity Master Timesheet

The entity master timesheet serves as a template for new HR employees that can then be tailored for a specific employee.

Typically the master timesheet is setup to suit the pattern of most employees, for example, 5 days a week from 9 to 5.

The master timesheet total hours must match the entity hours set on the Entity Setup form.

Delete the days not required and use the + (plus) or - (minus) keys to increase or decrease the start and end times as well as included break (in hours).

Entity Employee Entitlement Defaults

The entity default entitlements serves as a template for new HR employees that can then be tailored for a specific employee.

Set the annual and personal leave in days and enter a percentage for the annual leave loading that will be added to the base hourly rate.

Enter values for the overtime options A and B. The multiple is applied to the HR base hourly rate and is applicable to employees only.

The default overtime multiple is 1 (no overtime)! Enter a value between 1 and 10.

For employees, overtime options A or B can be selected on the timesheet data-entry screen.


HRM – Employee Master Timesheet and Entitlements

The HRM – Employee Master Timesheet and Entitlements are initially derived from the Entity Master and are then tailored for the specific employee.

The employee master timesheet serves as the template for the weekly timesheet that is then used by payroll.

Employee Master Timesheet

To access the employee master timesheet select page 5 on the HR detail form. Note, the master timesheet is available only for HR type Employee.

The master timesheet total hours must match the HR hours set on the HR details form.

Delete the days not required and use the + (plus) or - (minus) keys to increase or decrease the start and end times as well as included break (in hours).

Employee Entitlement

The employee entitlements concern the annual leave (holidays) and personal leave (sick leave, carers leave). Both entitlements are typically for full-time and part-time employees only.

The button 'Get entity default entitlements' is visible when new HR entitlements are recorded.

The form also provides information on long service leave due and taken.

Click the refresh buttons to get up-to-date values.

The recording of annual leave, personal leave and similar takes place on the HRM Employee Timesheet Data-entry form explained next.


HRM - Employee Periodic Timesheet Data-entry and Pay Information

Recording weekly employee timesheets can be initiated from the HRM main menu page Process Payroll or Manage Timesheets. Click on Add or review Employee Timesheets to open the HRM | Current Employee Timesheets form as shown below.

HRM | Current Employee Timesheets

The new form provides an overview of employees with and without timesheets in the current pay cycle.

The entries in the left list are active employees without timesheets in current pay cycle. To add a timesheet simply select an employee and then press 'Add new timesheet transactions'.

Entries in the right list are employees with timesheets. The list shows the total hours, the standard hours per period and the last pay date. To add additional timesheet entries, simply select an employee then press 'Add new timesheet transactions'.

To view existing timesheet transactions, select an employee and then press the button 'View timesheet entries in current pay cycle'.

HRM | Employee Timesheet data-entry

The new HRM | Employee Timesheet data-entry form is designed for easy data-entry of weekly employee timesheet and optional pay information.

On initial opening, the form populates the grid with the employee’s master timesheet data for the current pay period. By default, the record type of each entry is ORD (ordinary hours).

Note that the timesheet for the current pay period does not include any job related timesheet transactions an employee may already have! If the employee has job related timesheet entries in the current pay cycle the total is shown above the grid together with a button to access the transaction details.

Use the tab key to move through the fields. Use the + (plus) or - (minus) keys in the columns [Date], [Start], [End] and [Break] to increase or decrease the value.

Overwriting total hours will automatically adjust the end time.

Select the transaction type (default = ordinary hours) and enter an activity description.

Enter [x] in column [>] and then tab out to open the pay information form.

If no custom pay information is entered via column [>], the system will apply the default pay for the HR.

To find out about the grid options, view the above section Job Labour - Multiple Line-items (New) – Grid Options.

Payroll Information

Enter [x] into the field [>] and then tab out to open the payroll information form as shown on the right.

Press tab again and the default payroll information is retrieved.

Press the Esc key to close the form without saving.

Tab through all fields and onto the Save button and then press enter to save the payroll information.

Use the payroll information form if you want to record allowances for the day or record a different base hourly/daily rate or total for the day.


HRM - Payroll Central

The new HRM | Payroll Central form provides a convenient place to access all key activities that are part of the normal payroll cycle such as review options for timesheets in current pay cycle, authorisation for timesheets in current pay cycle and processing of authorised timesheets.

To access HRM – Payroll Central click on Process Payroll on the HRM main menu page.

Menu Options

Add or review Employee Timesheets - Click this option to review or add employee timesheets. The number of entries shown includes un-authorised, authorised and rejected transactions.

Authorize Timesheets in current Pay Cycle - Click this option to authorised timesheets in current pay cycle. The number of entries shown includes un-authorised transactions only.

Process Payroll - Click this option to process authorised timesheet transactions. The number of entries shown includes authorised transactions only.

Review Job Timesheets - Click this option to view all un-authorised job transactions. The number of entries shown includes un-authorised transactions only.

Add Job Timesheets - Click this option to add new job timesheet transactions.

Last Payroll Run - Click this option to view summaries of past pay runs.


HRM - Payroll Transaction Authorisation

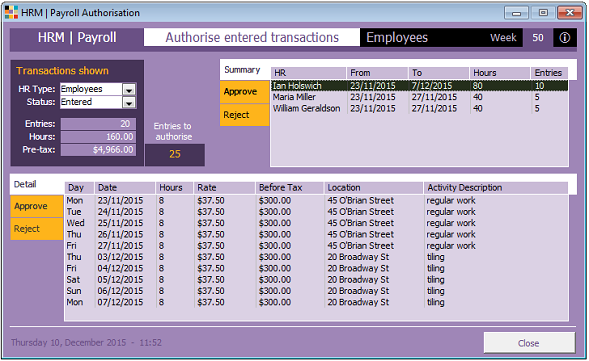
The new HRM - Payroll Transaction Authorisation form is designed to authorise timesheet transactions for the current payroll cycle.

Access to the authorisation form can be restricted to nominated HR via the User System Access Rights option of the HR details form.

By default all new job timesheet/labour and employee timesheet transactions have the status 'entered'.

The authorisation form provides batch or individual transaction update options to approve the timesheet entries for payroll processing by setting the status to ‘approved’.

The batch options allow also reviewing and altering the status of authorised and rejected transactions as well as reverting entries back to the 'entered' status.

Transactions authorised for payroll processing can no longer be modified unless opened from this form! Only authorised transactions can be processed in the payroll module.

Menu Options

On open the form shows transactions entered for employees. Click on an entry in the summary list at the top to view the timesheet entries in the lower list.

Select a record in the summary list and click Approve to approve all timesheet entries for that HR.

Alternatively, select one or more timesheet entries in the lower list and click Approve to approve the selected entries.

To authorise transactions for contractors, select the HR type in the Transactions shown area.

The Entries to authorise value includes employees and contractors.

Double-click an entry in the lower list to open the timesheet details.

Note that once approved, timesheet entries can only be altered when opened from this form!


Improved Functions

The The following improved system functions are now available in Release 6.51.11

Data exports to Microsoft Excel

All data that can be exported from PCBx3 Manager is now uniformly formatted.

Client Request Details

The request details form was modified and includes now a reference flag to set the request type.

Creating a new request will set the Received by drop-down menu to the currently logged in system user.

A folder button allows automatically generating a folder for the request below the site folder. If no site folder exists, the user is prompted to automatically generate a site folder first.

Request Register

The request register was modified and includes now a search option for the request type.

Project Register

The project register was modified and menu functions were grouped in an easier and more consistent way. To access the menu options, double-click a list entry.

Project and Service Jobs

A key project or service job Microsoft Excel file can now be generated new or an existing file can be selected. Once created/selected the file will open at the push of a button on the project / service job registers or project/service job details.

Sales Invoices

All sales invoice types were reviewed, improved and made consistent. Terms and conditions can now be altered on the form by simply double-clicking in the term field. To view the entire terms and conditions, use the arrow next to the fields.

Cash Sale Invoice

In previous versions, the cash sale invoice required first the free form or line-item selection. The cash sale invoice opens now the free form selection by default ready to enter a description and amount.

GL Transaction Inquiry

The GL Transaction Inquiry opens now displaying today’s general ledger transactions.

HR Details

The HR Details form was modified and all payroll related items are now grouped on one page that can be access restricted.

The trade/service category list allows now setting one trade as default. For new HR records, the first allocated trade is set as default.


Bug Fixes

The following bugs were fixed in Release 6.51.11

Service Job - Sales Invoice Line-item

In previous versions, the description field of the Sales Invoice Line-item for Service Jobs could only be enlarged for existing transactions, not when creating a new line-item. This was fixed and can now be enlarged for either.

Default Invoice and Quote Terms and Conditions

There was a bug when allocating default terms and conditions on the entity setup form and then changing the terms. The changed terms did not take effect correctly. The bug was fixed and it applied to both invoice and quote terms and conditions.


Installation and Licensing Information

Important Installation Notes

Upgrading to Release 6.51.11 requires an existing Release 6.41.73 installation.

For a successful upgrade, follow the Installation Guide on the download page.

To view the Release 6.51.11 download details, click here.

Licensing Information

Upgrading to Release 6.51.11 may require a licence upgrade.

If not sure if your current licence is sufficient, simply contact Blake Developments.

Thank you...

Thank you for choosing PCBx3 Manager, we hope you enjoy the new features.