This part of the system documentation deals with all MCM menu items on the main menu tab Maintenance.
Items on this tab are frequently called when user-interventions are required on the Data Import Console.
It makes frequent references to other parts of the full MCM documentation.
This topic includes the following sections:
The Corporate Credit Rating Indices apply in general to debt securities and in particular to the MCM Authorised Investments – Credit Rating Limits.
The chapter here deals only with the maintenance of the indices. To read more about how to apply the indices to the portfolios Authorised investment limits – credit
rating limits view the topic Portfolios.
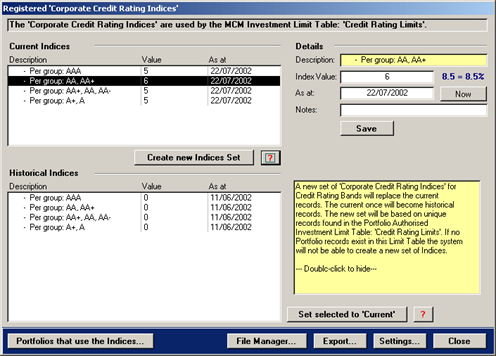
The Corporate Credit Rating Indices form shown below contains the current indices and historical indices.
Each button is described below.
In the list box, double-click a current index record to modify the details.
Press the Export button to export the historical indices to MS Excel.
The Current Indices are used by MCM during the import/translation processes and prior to applying the index weight, MCM verifies if the valuation date of the
indices is appropriate to the selected run-date. In the event that new indices are required, MCM prompts the user to create new indices or alternatively historical indices
might require to be set as current.
When creating new indices (button Create new Indices Set), MCM retrieves unique credit rating band records from the table that holds the MCM Authorised Investments – Credit
Rating Limits.
The unique records are added to the Corporate Credit Rating Indices table and the current indices batch in this table is set to historical and the new
records become the current indices. Once the new records are created the user needs to update each current index record with the correct index value and the valuation date.
To edit/modify the index value, double-click a record from the current list box and the record details will appear in the Details section shown above on the right
hand side. Only the index value, date and notes fields can be modified, not the credit rating band description. Once the value is entered, pressing the Save button will update
the underlying table and the list box shown on the left.
To set a historical batch to current, select a record in the historical batch and press the button Set selected to Current. MCM will first set the
existing current batch to historical and then set the selected historical batch to current. This might be required if older data is monitored and MCM requires
the corresponding indices.
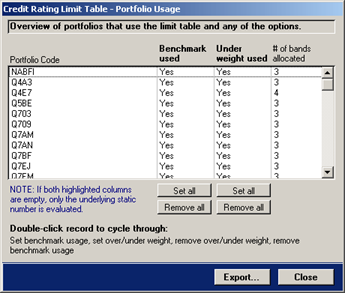
Press the button Portfolios that use the Indices… to view the portfolios that make use of these indices. The form that will appear is shown below.
If both columns are empty then Portfolios do not make use of the Corporate Credit Rating Indices.
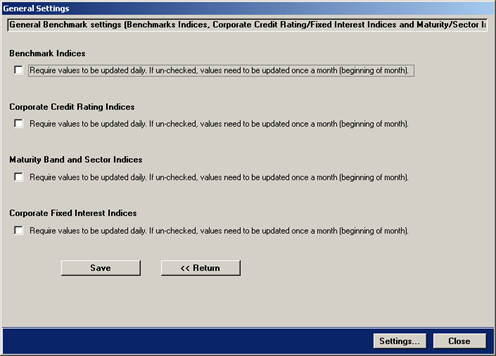
On the main form shown on the previous tab, pressing the button Settings will show the below shown form.
The form and how it applies to portfolios is discussed in the topic Portfolios.
The General Settings tab provides a check box for all indices MCM make use of. The check box indicates if MCM should request new indices for each run-date or use a
current set throughout the month.
Once set, press the button Save to save the settings. Press << Return to return to the previously shown tab.
Related Topic: Portfolios – Chapter Authorised Investments – Credit Rating Limits.
The Corporate Fixed Interest Indices apply in general to debt securities and in particular to the MCM Authorised
Investments – Fixed Interest Limits. The chapter here deals only with the maintenance of the indices. To read more about how
to apply the indices to the portfolios Authorised investment limits – fixed interest limits view the topic Portfolios.
The Corporate Fixed Interest Indices form shown below contains the current indices and historical indices.
The Settings button was discussed in the previous chapter.
Double-click a record to view the details.
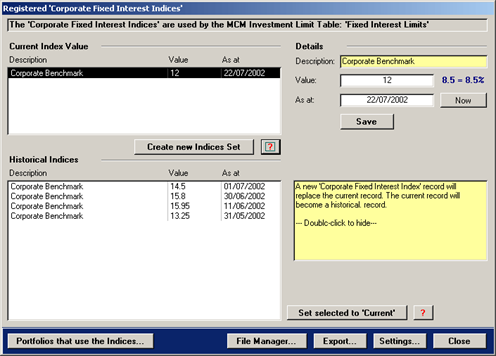
This button is explained on the next tab.
The Current Index Value is used by MCM during the import/translation processes and prior to applying the index weight, MCM verifies if the
valuation date of the index is appropriate to the selected run-date. In the event that a new index is required, MCM prompts the user to create a new record or
alternatively a historical record might require to be set as current.
When creating new indices (button Create new Indices Set), MCM simply creates a new record and the existing current record is
set to historical and the new record becomes the current index. Once the new record is created the user needs to update the correct index value and the valuation date.
To edit/modify the index value, double-click a record from the current list box and the record details will appear in the Details section shown above on the right
hand side. Only the index value, date and notes fields can be modified not the description. Once the value is entered, pressing the Save button will update the underlying table and
the list box shown on the left.
To set a historical record to current, press the button Set selected to Current. MCM will first set the existing current record to historical and
then set the selected historical record to current. This might be required if older data is monitored and MCM requires the corresponding index.
Press the button Export… to export all historical indices to MS Excel.
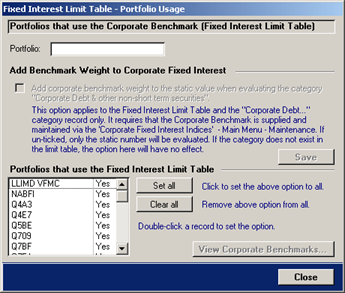
Press the button Portfolios that use the Indices… to view the portfolios that make use of these indices. The form that will appear is shown below.
If the last column is empty then Portfolios do not make use of the Corporate Fixed Interest Indices.
The form and how it applies to portfolios is discussed in the topic Portfolios.
Related Topic: Portfolios – Chapter Authorised Investments – Fixed Interest Limits.
The Maturity Bands and Sector Indices apply in general to debt securities and in particular to the MCM Authorised Investments – Duration
Weighted Limits. The section here deals only with the maintenance of the indices. To read more about how to apply the indices to the
portfolios' Authorised investment limits – duration weighted limits view the topic Portfolios.
The Maturity Bands and Sector Indices form shown below contains the current indices and historical indices.
Double-click a record to view the details.

The Current Indices are used by MCM during the import/translation processes and prior to applying the index weight, MCM verifies
if the valuation date of the indices is appropriate to the selected run-date. In the event that new indices are required, MCM prompts the user to create
new indices or alternatively historical indices might require to be set as current.
When creating new indices (button Create new Indices Set), MCM retrieves unique records from the table that holds the MCM Authorised
Investments – Duration Weighted Limits.
The unique records are added to the Maturity Bands and Sector Indices table and the current indices batch in this table is set
to historical and the new records become the current indices. Once the new records are created the user needs to update
each current index record with the correct index value and the valuation date.
To edit/modify the index value, double-click a record from the current list box and the record details will appear in the Index Details section
shown above in the lower section. Only the index values, date and source fields can be modified not the description. Once the value(s) are entered, pressing
the Save button will update the underlying table and the list box.
To set a historical batch to current, the historical records need to be shown first. Press the button Show Historical Records. The large list
box will now show historical records. To provide visual glue, the background of the list box changes to light yellow.
The historical records are shown below.
To set a historical batch to current, press the button Set selected to Current. MCM will first set the existing current batch
to historical and then set the selected historical batch to current. This might be required if older data is monitored and MCM requires the
corresponding indices.
The index value of historical records can not be altered!
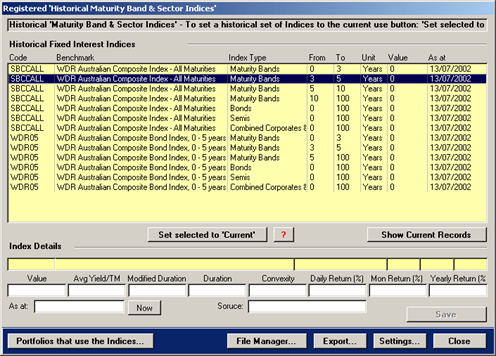
To return to the current indices, press the button Show Current Records.
Press the button Export… to export all historical indices to MS Excel.
Press the button Portfolios that use the Indices… to view the portfolios that make use of these indices. The form that will appear is shown below.
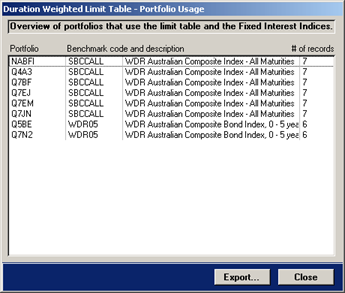
The above form provides an overview of all portfolios that make use of the authorised investments for duration weighted limits.
Related Topic: Portfolios – Chapter Authorised Investments – Duration Weighted Limits.
The Registered' Securities without Issuer and/or Credit Rating form is shown below. New records are added
automatically to this register every time new securities are encountered during the import/translation processes.
The purpose of the register is to allocate an Issuer and/or Credit Rating to a Security. The register is for non-equity securities only.
Filter Records Use the Show… section to filter records.
Click a column heading to sort the records.
The custodian already provides some securities with a credit rating - preserve it or overwrite it.
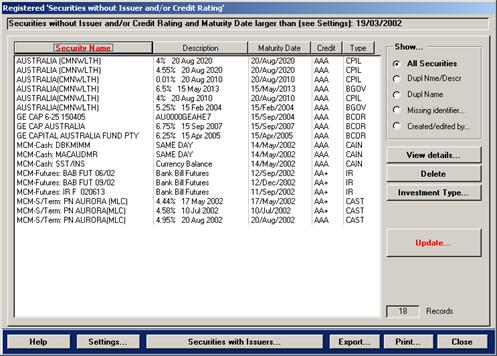
There are several buttons on the right of the above shown from, they provide the following functions:
| View details… |
Click this button to view the security details on a separate tab. |
| Delete |
Press this button to delete one or more selected securities. |
| Investment Type… |
Click to see a full description of the security's investment type.
The Investment Type code is displayed on the above form in the last column. |
| Update… |
Press this button to update one or more records.
After pressing the button, the allocation tab is displayed.
The tab is discussed in detail further below. |
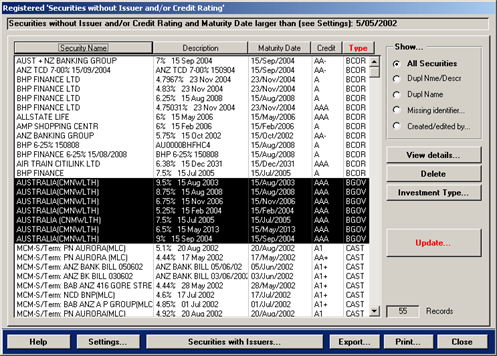
The buttons across the bottom of the above shown form provide the following functions:
| Help |
Click this button to access the help topic. |
| Settings… |
Press this button to view the settings for the register.
The Settings tab is discussed further below. |
| Securities with Issuers… |
Click the button to open the Registered Issuer Securities.
When opened from the above shown tab, the Registered Issuer Securities form will not display
specific records.
For more information on the Registered >Issuer Securities view
the topic Registers' – Issuer Specific Securities.
|
| Export… |
Click this button to export all records displayed to MS Excel |
| Print… |
Click this button to preview a report with the displayed securities. |
The following example illustrates how to allocate an Issuer and Credit Rating to 1 or more securities.
The selected securities from above appear on the allocation screen below.
- Select 1 or more securities – in the example shown below, 7 Australian Commonwealth Treasury Bond securities are selected
- Press the button Update – this will show the allocation screen shown further below
The screen shown below is designed to allocate the Issuer and/or Credit Rating.
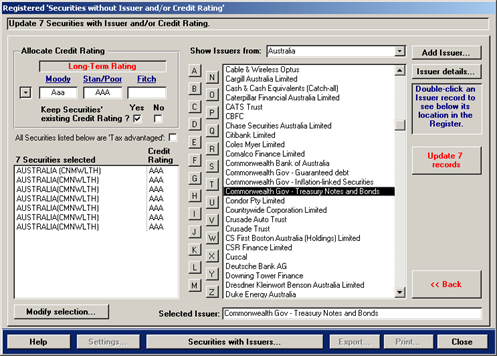
Use alphabetical buttons for quick location searches
- Tax Advantaged Tick this box if the securities are Tax Advantaged
- Credit Rating Select the Credit Rating to be allocated to the selected securities
- Issuers Select the Issuer from the available Issuer/Country list.
- Preserve existing Credit Rating Tick to overwrite or preserve existing credit ratings
- Select the Credit Rating from the top left corner section Allocate Credit Rating
- Select the Issuer from the Issuer list-box
- Press the button Update 7 records. Note: the button caption changes according to the # of securities selected
This will update the selected securities with the credit rating and issuer. The screen will return to the list of
securities that require an issuer and credit rating. The just updated securities will no longer be in this list.
- Return to previous screen To return to the previous screen either update the records, or press the button Modify selection… or << Back
- Add new Issuer If securities are encountered and the corresponding issuer is not yet registered, add a new issuer.
- View Securities allocated to Issuer select the issuer and then press the button Securities with Issuers…
To find out more about Securities with Issuers… view the topic Registers – Issuer specific Securities.
To view a new issuer allocated to a different country then the one shown on the update page, select the same country on the update page.
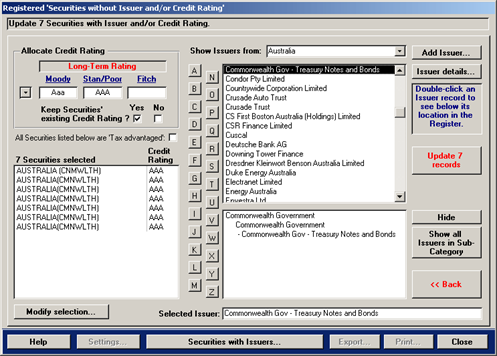
Functions available on the allocation screen shown above:
- Issuer's location in the Debt Issuer Register – Issuers are allocated to categories and sub-categories and the above
shown issuer list-box allows to view an issuer's location within the debt issuer register.
- Double click an issuer record and a second list-box appears below. In the above shown example, the
issuer Commonwealth Gov – Treasury Notes and Bonds resides in the debt issuer register under the
category Commonwealth Government and in the sub-category Commonwealth Government.
- To view all other issuers within the same location/category, click the button Show all Issuers in Sub-Category.
To hide the location list-box, click the button Hide.
To add a new Issuer, press the button Add Issuer… and the following dialog box will appear:
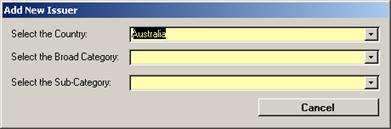
Select the Country, the broad category and sub-category and the button Add new… will appear on the dialog-box shown
on the left.
For more details on Issuers, view the topic Registers – Debt Issuer Register.
To view the details of an Issuer, click the button Issuer details…, this will open the Issuer Details form.
This form is discussed in the topic Registers – Debt Issuer Register.
To update the securities with the selected issuer and credit rating, press the button Update 7 records.
The following confirmation dialog appears.
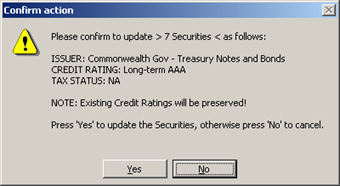
Press the button Yes to update the records and return to the page that appears when the form is opened first.
Press No to cancel and select a different issuer or credit rating.
The Security Details page is shown below. It shows the details of one security and it can also be used to allocate
an issuer and credit rating.
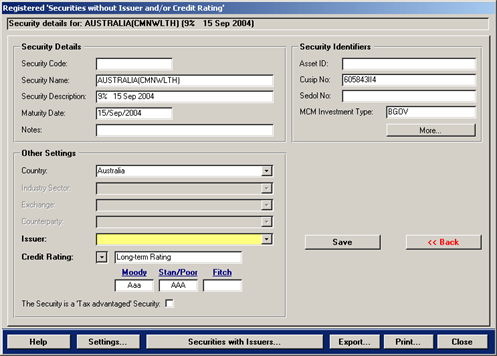
Allocating an Issuer and a Credit Rating to 1 security
Allocate an Issuer and/or Credit Rating using the Security Details screen shown above:
- Select the Issuer from the drop-down menu
- Select the Credit Rating from the drop-down menu
- Press the button Save
- To return to the securities list, press the button << Back
The Settings page of the Registered Securities without Issuer and/or Credit Rating form
is shown below. It caters for two settings only. The settings are describer below.
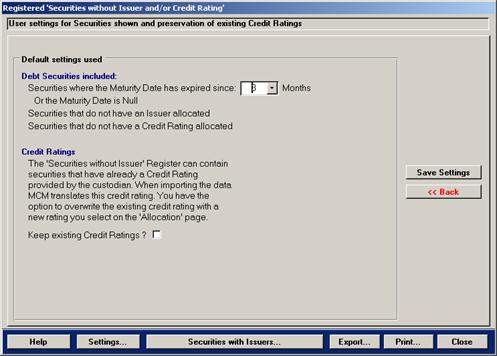
The settings currently available are:
Debt Securities included – the register can contain many records some of the securities might have expired already.
When the form is opened the following criteria is applied to the securities to be shown:
- Unexpired securities
- Securities that are expired since 3 Months (User-definable setting)
- Securities where the Maturity Date is Null
- Securities that do not have an issuer allocated
- Securities that do not have a credit rating allocated
Credit Ratings – this option check-box sets the default for MCM to either preserve or overwrite existing credit ratings.
Ticking the check-box on the allocation page shown on the previous pages will overwrite this setting.
Equity securities encountered during the import/translation process are verified against the Registered
Security Stock Codes register and if no stock code was provided and the security is not present in the register,
the security will be added to the register.
Click a column heading to sort the records.
Filter Records Use the Show… section to filter records.
Export / Print Exports all displayed records to MS Excel or preview and print a report.
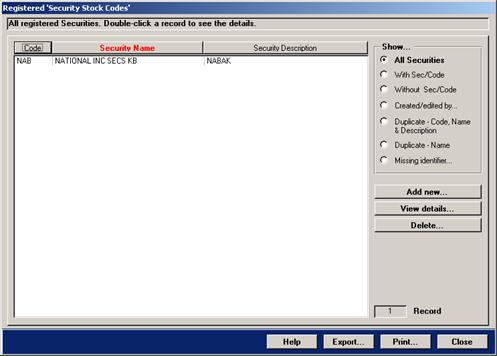
Select a security and double-click the record or press the button View details…. This will show the security
details.
For overseas listed Property Securities or Property Securities not listed on the domestic stock exchange
select Property from the Security Category drop-down menu.
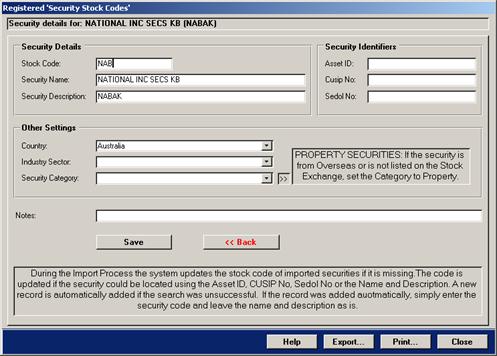
Fill in the security stock code and press the button Save. To return to the security list, press the
button << Back.
The Registered Underlying Security Stock Codes register is shown below and it is designed to hold security stock
codes for securities where the underlying security's stock code varies to the stock code of the security.
For example, the General Property Trust's underlying security code is GPT but GPT also issues securities where the security
code is GST. For MCM to know that the underlying security is GPT, the GST record needs to be added to this register.
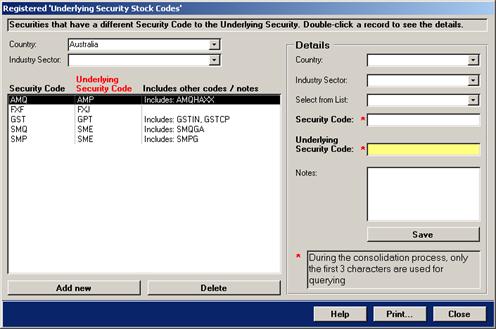
To add a new security code to the above register, click the button Add new.
To delete a security code from the above register, select the security and then click the button Delete.
To change the details of an existing security code, select the security and the details will appear in the right Details section. To save the changes, press the button Save.
New security stock codes might contain more then 3 letters. When determining a security's underlying security stock code,
MCM uses the first 3 characters only! Therefore enter only the first 3 characters and refer to the full securities code in the
notes section.
The Registered Assets not held with Custodians form is shown below. The form allows nominating assets that are not held with the
custodian to be included in the calculation of a portfolio's net asset value (NAV).
Nominating these assets should only be done if the custodian does not include them in their daily/monthly custodian data.
MCM adds a portfolio's assets not held with custodians to the portfolio's physical holdings during
the consolidation process. MCM does not keep historical records of these external assets, however historical key portfolio values kept
by MCM include the physical component making up a portfolio's NAV. This will include the assets not held by custodians where applicable.
When first opened, the form displays the portfolios that have nominated assets not held with custodians.
MCM requires that the amount be updated on a monthly basis. This forms part of the import / translation processes user intervention.
To remove a portfolio's assets not held with custodian enter a zero into the amount field and press the button save.
This will make the record disappear from the list.
To view all portfolios, click the button Show all active Portfolios. The form below shows all active portfolios, thus making it easy to allocate assets not held with
custodian to a particular portfolio.

Double-click a record to view/modify the details
A portfolio's assets not held with custodian is also shown on the Portfolio Details form.
The form is discussed in the topic Portfolios in the chapter Portfolio Details.
The Benchmark Indices apply to all portfolios. MCM requires that each portfolio be allocated with a benchmark. To read more about how to allocate a benchmark to a portfolio
view the topic Portfolios.
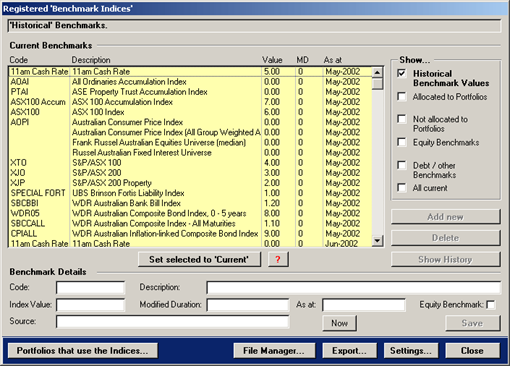
The Benchmark Indices form shown below contains the current indices and historical indices.
Double-click a record to view/modify the details.

The above shown form is made up in two sections, the upper section contains the list box, the Show… option group and several buttons. The lower section contains the
details of a selected record and the Now and Save buttons. The show the details, select and double-click a record in the list box.
The upper section's buttons are discussed below.
| Add new |
Press this button to add a new benchmark record.
The new record will automatically be part of the current set.
|
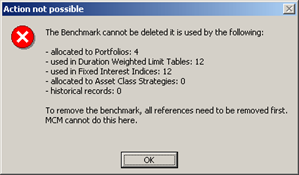
| Delete |
Select a record in the list box and press the Delete button to delete a benchmark record.
If the benchmark is allocated to a portfolio or authorised investment limit table, the below shown message will appear.
|
| Show History |
Select a benchmark record in the list box and then press this button to view historical index values of the selected benchmark.
The background of the list box will change to light yellow. |
| Create new Set |
Press this button to create a new set of current benchmark indices.
The system will archive all values of the current set before setting the index value and MD of the current set to zero and date to the current system date.
The values need now manual updating. |
The Show… options provide the following functions:
Historical Benchmark Values – press this option to view all historical benchmark indices. The updated screen is shown below.
Some buttons are disabled when viewing historical records and the original button
caption Create new Set is now Set selected to Current.
Allocated to Portfolios – press this button to view all benchmarks that are allocated to portfolios.
Not allocated to Portfolios – press this button to view all benchmarks that are not allocated to portfolios.
Equity Benchmarks – press this button to view all benchmarks that are equity related.
Debt/other Benchmarks – press this button to view all benchmarks that are not equity related.
All current – press this button to view all current benchmarks (default).
| Set selected to Current |
Press this button to update the current benchmark indices with the
values of the selected historical batch. The system will archive all values of
the current set before. This might be required in the event of older data being monitored.
|
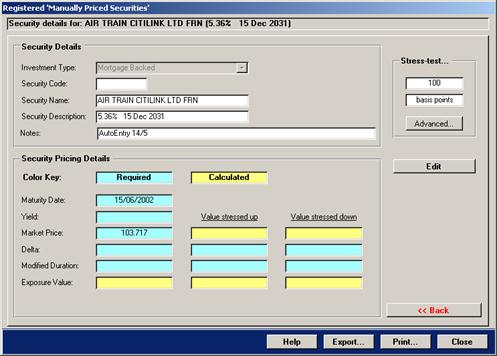
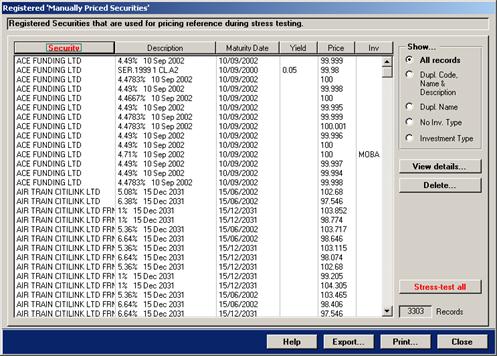
The Registered Manually Priced Securities form, shown below, is designed for securities
that require manual pricing. Manual pricing refers to the fact that some prices need to be manually sourced.
This applies only to securities such as Inflation-linked, Mortgage-backed, Asset-backed and FRNs. The
additional pricing information is over and above what custodians already provide and it is only necessary
if a comprehensive risk exposure report is sought.
The additional pricing information is required during the stress testing of securities. Although
MCM uses guidelines that monitor movements under stress, this generally applies to bank bills
and bond futures only.
Filter Records Use the Show… section to filter records.
Click a column heading to sort the records.
MCM automatically stress tests all securities as part of the consolidation process. If the risk exposure report is required, then pricing for the above securities
is necessary otherwise the pricing does not need to be updated!
If the pricing is not updated the stressed Net Asset Value is not correct. The stressed NAV value is not used anywhere apart from the risk exposure report!
Updating Pricing Information
- Select the security and double-click the record or press the button View details…. This will show the Security Details screen shown on the next page.
- Press the button Edit on the detail page.
- Enter the pricing information.
- Press the button Calc Stress and then Save.
- To return to the above shown screen, press the button << Back.
The details page consists of yellow and light blue fields. The light blue fields require manual
updating and the yellow fields are automatically calculated. To enter details, press the
button Edit first.